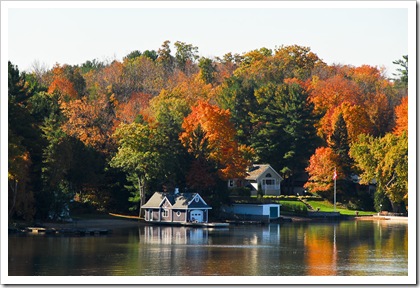
A few older ones from the archives… These were shot around Lake Muskoka, Ontario, Canada, in the fall of 2006.


Gear notes: D200, 18-200VR
Click on the image(s) to see a larger version
A few older ones from the archives… These were shot around Lake Muskoka, Ontario, Canada, in the fall of 2006.


Gear notes: D200, 18-200VR
Click on the image(s) to see a larger version
How much is too much? In other words: how far can you push it in post-processing? I don’t believe there is just one answer. After all, it is a matter of personal preference, and dependent on the intent the photographer wants to express with the picture.


For now, I keep my preference for the ‘natural’ look when taking the HDR route. But I will continue to experiment and explore more creative opportunities whenever there’s a hint of an interesting outcome. After all, post-processing has always been part of the fun, whether the room is dark or light…
Gear notes: D700, 17-35/2.8
Click on the image(s) to see a larger version
One of the last places you expect signs of the Halloween craze is in a quiet, religiously inspired setting… And yet, in the beautifully preserved 16th century beguinage of Diest, that’s where I found some during a recent Saturday afternoon photowalk.
Today, the once secluded community is recognized as an UNESCO World Heritage site. It houses a museum, a cultural center, a lace-making school and an art gallery. The current residents are mostly senior citizens. Still a great place for great pictures!
Gear notes: D700, 24-70/2.8
Click on the image(s) to see a larger version
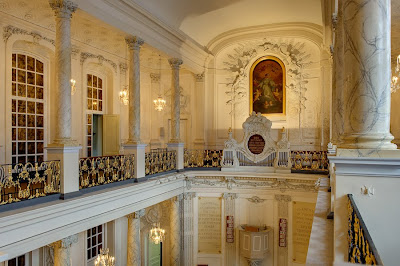
 Located on the Museum Square, on Brussels' Mont des Arts, the private chapel of the palace of Charles de Lorraine is an artistic jewel from the 18th century. Originally a catholic chapel, it was attributed to the protestant religion by imperial decree of Napoleon in 1804. King Leopold the first, a protestant Monarch, attended service there, as did the princes of Orange before him, and thus the church was called the "Royal Chapel”. The building has been completely restored to its original decoration in white and gold in 1970 and 1987.
 Besides its religious role, the protestant chapel also has an important position in the musical culture in Brussels. It houses both an 1840 Dreymann organ and a 1699 Forceville organ. On a regular basis, the chapel welcomes concerts and also offers the pupils of the "Conservatoire Royal" the space and quality instruments for their end of term contest. The Church is also used for recordings by renowned artists.
 This chapel presents quite a photographic challenge. The different light sources with widely varying intensities, combined with the subtle colors and tones of the decoration make it very hard to realize anything close to a realistic rendition (there really is NO white to be found in this chapel...). An excellent playground therefore to test and refine my HDR capture and processing techniques!
 I was lucky to be introduced to this magical place by a friend, who truly knows every corner of Brussels worth photographing. You normally have to make an appointment with the volunteer guides to visit. In the summer however, there is a permanency on Thursday afternoon.
Gear notes: D700, 17-35/2.8, 24-70/2.8
Click on the image(s) to see a larger version